Step by step instructions for making hurricane candles.
In addition to the normal items required for standard pillar candles, you will need the following items:
- High-melt straight paraffin with a melting point above 150F
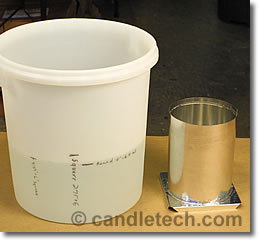
- A mold with a diameter of 4″ or wider
- Hurricane insert (sometimes called a sleeve)
- Cookie Sheet with about a half-inch lip.
- Silicone spray or Pam
- A utility knife or a small paring knife.
- Embedments, if desired
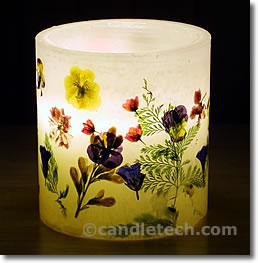
 Many items may be used as embedments for hurricanes:
- Dried Botanicals
- Glass Beads
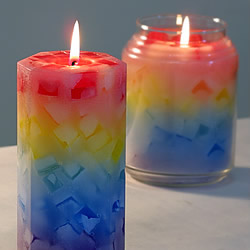
- Wax Chunks
- Silk Flowers
- Etc.
Instructions:
 Step 1. Melt wax and add dye and/or additives.
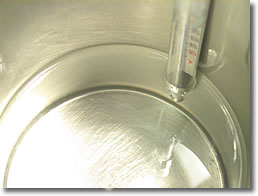
Using a double boiler and a thermometer, melt your wax and bring it to a temperature of about 190 degrees F. You will need to melt enough wax to fill your mold (handy calculators).
You may add a touch of dye if desired to tint the wax. Too much dye will diminish the amount of light that is permitted to pass through the candle. Universal additive (1-2%) or White microcrystalline wax (1-2%) is optional. We are going to use 1% white micro to provide a slightly more durable shell (high melt paraffin can be somewhat brittle).
 While your wax is melting, review and carryout step 2 and 3.
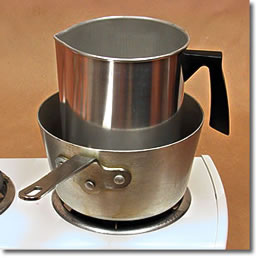
 Step 2. Set up a water bath.
Set up a water bath. Details can be found here (water baths). This step is not entirely necessary, but will speed things up dramatically and will produce a better looking finished product.
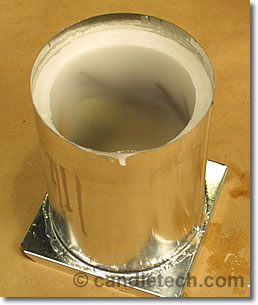
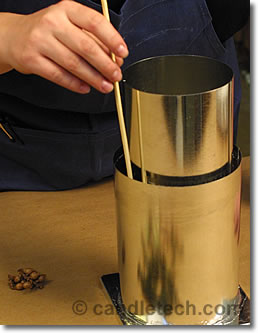 Step Three: Prepare Your Mold.
If the mold you selected has a wick hole, plug it with some metal tape or mold sealer.
You may wish to lightly coat the interior of your mold with silicone spray or cooking spray to aid in removal of the finished shell. After spraying, wipe out any excess with a paper towel, leaving only a light film to coat the interior of the mold.
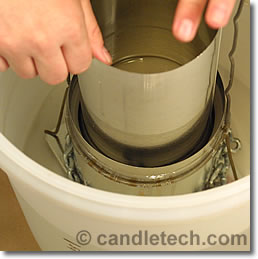
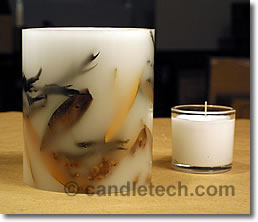
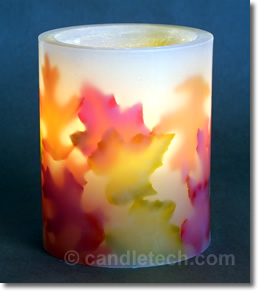
If you are using a hurricane insert, place it inside the mold. Then surround the insert with the embedments of your choosing, taking care to arrange them how you would like them to appear in the finished candle. The purpose of the insert is to hold embedments against the sidewalls of the mold just long enough for them to adhere to the wax that will eventually solidify around them.
If you are not embedding anything in the walls of the shell, then you do not need the insert.
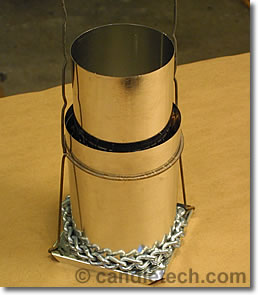 If you are using a water bath (and you should be), attach the appropriate weights to the bottom of your mold.
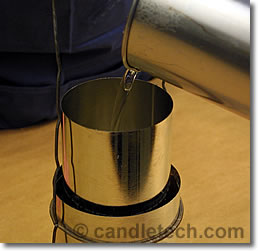 Step 4. Pour wax.
Double-check your wax temperature to make sure it is between 185-195 degrees F.
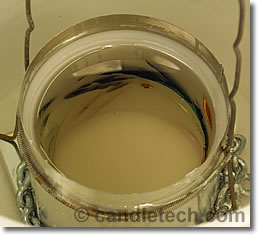
Pour your wax down into the center of your mold insert. You may need to lift the insert slightly off the bottom of the mold to allow the hot wax to run up the sides. Fill your mold to a height that you would like the finished candle to be. Generally, it is best to cover your embedments by at least half an inch.
Once filled, wait a minute or two and then tap the sides of the metal mold with a blunt instrument, such as a wooden spoon, to free any air bubbles.
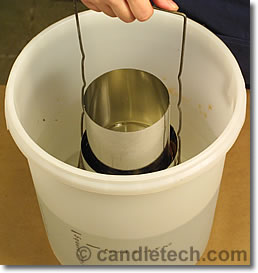 Step 5. Place in water bath.
Carefully place the mold into the water bath. The mold is very hot at this point, as is the wax inside it. Oven mits might come in handy here.
During cooling, lift the insert slightly off the bottom about every 2-3 minutes. This will prevent the insert from becoming embedded in the cooling wax on the bottom of the mold.
 The wax will cool from the exterior and begin to solidify inward. Once you are confident that any embedments are being held in place by the solidifying wax, remove the insert completely.
 With the insert removed, allow the sidewalls to continue to solidify. Once the sidewalls are about a half inch thick, remove the mold from the cold water bath. It takes only about 20 minutes in a water bath to form a shell of the proper thickness.
 Step 6. Pour out inner wax.
Remove any weights from the mold. Briskly dry the exterior of your mold with a towel to remove any excess water.
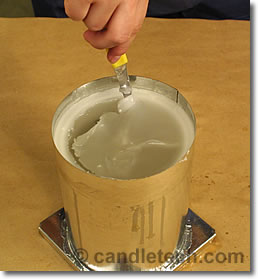
The surface of the wax may have formed a skin. Using a paring knife slice an opening all the way around the top. You will want to slice at a position that is just at the inner edge of the sidewalls. Scoop the skin out with a spoon before it sinks to the bottom, or else it will quickly stick to the bottom.
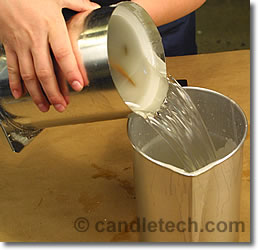 In one quick, smooth action, dump the inner liquid wax back into your melting pot.
 Step 7. Remove from mold.
Allow your hurricane shell to completely cool before attempting to remove it from the mold. Trying to remove it too early is likely to result in a cracked shell, or a marred exterior. Be patient.
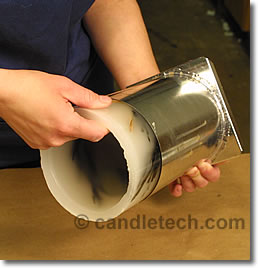 If your hurricane shell does not slide out of the mold easily, then try chilling it in the refrigerator for about 20 minutes.
 Step 8. Level the top.
Place a cookie sheet on top of a pot of simmering water. The heated cookie sheet can then be used to melt away some of the wax on the top rim of the hurricane shell. Level the top to provide a clean appearance. If you have an electric griddle, you may wish to use that in a similar manner on low heat.
 You may also use a paring knife to help trim away any sharp edges.
 Step 9. Insert Votive
Place a votive holder containing a votive candle inside your finished shell. Or, you may use a small container candle (votive size), as we did here.

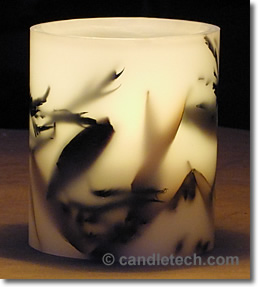
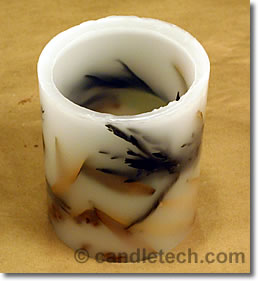
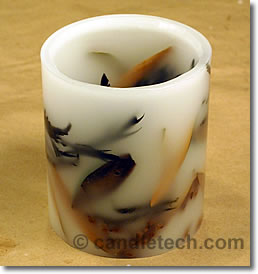
Hurricane Gallery.
Here is the finished candle from this project.


Superb….
Marvelous work
Was dried botanical used in the last floral colourful one?
Hi Olivia. Yes, those are dried botanicals. It’s really tricky though. That was 15 years ago. If I were doing those today, I would experiment with using modpodge to apply them. With modpodge, you would be able to control foreground and background presentation of the botanicals. I would also use something like a medium melt point straight paraffin vs a high melt point straight paraffin, for the increased translucency. And, I’d couple it with LED candles for illumination. I hope that helps. 🙂
where can i buy them molds?
Hi,
I tried to make this candle and I poured paraffin wax at 85°C. Once cooled and removed I could not see my objects that I added on the sides of my candle. I tried using a heat gun too to make it translucent but it got worse in the process. Could you help what can I do to improve it or what went wrong? Thanks