
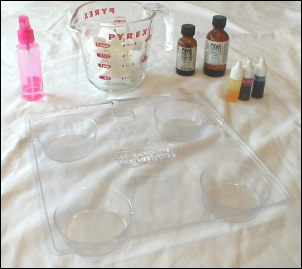
 Begin by gathering all your supplies. Pictured I have:
- melt & pour soap (cut into chunks for easier melting)
- soap dyes and fragrance oils
- soap mold
- glass measuring cup (for melting and pouring
- squirt bottle filled with alcohol (to “kill” bubbles – this is optional)
- popsicle sticks (to stir soap)
Not pictured is waxed paper, which you can place under your work space for easier clean up, and Saran Wrap which you can use to cover your container when melting to keep in moisture.
Instructions:
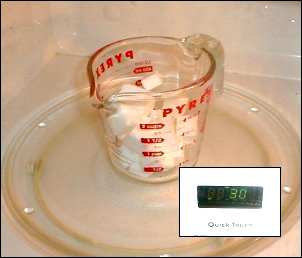
Step 1: Place soap in microwave and melt for 10-30 second intervals, depending on amount of soap. 1 1/2 cups of chunks usually takes about 45 seconds (30 seconds, stir, then back in for 15 seconds), in my microwave. But since microwave ovens vary, you want to keep a close watch on your soap. You don’t want the soap to get too hot (see hints and tips). Check the soap every now and then, giving it a gentle stir, repeating until lumps are melted.
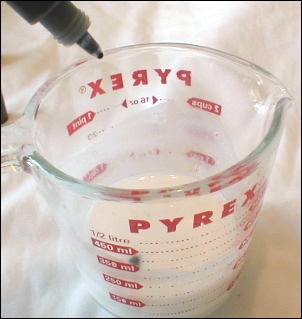 Step 2: When the soap is melted, add your soap safe fragrance oil (about ½ – 1 TBSP per pound of soap), stir and add coloring. (Note: sometimes the fragrance oil can discolor the soap. This is why I like to add the fragrance first, then the dye.) Do not add your fragrance oil when the soap is too hot, or the oil can burn off. Let the soap cool enough that you can stick your finger in it without having to call the paramedics, but not so cool that a skin starts to form on the top.
After adding your fragrance and dye, stir gently until all additives are mixed in with the melted soap.
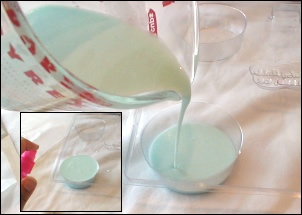 Step 3: Carefully pour your soap into clean molds. I like to line my molds with a thin coating of petroleum jelly. This helps with the removal of the soaps.
Now is the time where you would kill the bubbles by spritzing the soap with a bit of alcohol. This is an optional step. Personally, I like to squirt the bubbles and watch them disappear, but some people don’t like the thought of putting alcohol on their soap.
Let the soap sit until hardened. If you are impatient like me, wait 10 minutes, then carefully move the mold to fridge until they are solid.
 Step 4: When your soaps are hard and set (usually in about 1/2 hour to an hour), you can try to gently remove them from the mold. Sometimes they pop out, and sometimes they are more stubborn. If they do not come out with gentle prying, place them in the fridge for a half-hour (you can also try the freezer for a little bit) and try removing them again.
Soaps are ready to use as soon as they harden!!
Helpful Hints and Tips
- Generally ½ ounce pf fragrance oil per pound of soap is used, and about half that amount when using EOs (Essential Oils). This does vary, however, depending on the oil. Some are more potent than others.
- Overheating the soap can cause it to discolor, become odorous, lose moisture or lose its transparency.
- Soaps should be wrapped soon after demolding to preserve fragrance and minimize sweating. Saran Wrap works great for wrapping soaps, and you can get very creative with packaging. (If you have put the soaps in the fridge to harden, wait until the soap is room temperature before wrapping.)
- Remelting soap over and over can cause it to become dry and brittle.
- Only use fragrance oils that are skin safe.
- Always use caution when making soaps with children. When melted, the base is hot.
Leave a Reply